Pages

Monday, November 26, 2012

More apples from Alaska

Using your apples from Alaska bounty is easy with many recipes that are simple to do using a crock pot.  This recipe works well for spiced apples and can be used for ice cream topping, as applesauce, in other recipes, and as pie filling!  Yum!
 
If you are out of Alaska apples, you can use the ones from the store as well.  When I run out of my own product I get the apples from the sale cart and they work wonderfully, and you are probably keeping them out of the land fill!
 
Start with your fresh Alaska apples, I used Carroll apples for this recipe as we had a lot of those.  Peel and core the apples (save the peels and cores for the worms - see next blog post for more about that)!
 
Place all of the apple product in your largest crock pot - this is an 8 - 10 quart pot.  The product will cook down so if you have some that wont fit you can add it as it cooks down.

 
Sprinkle the whole lot with cinnamon, nutmeg and brown sugar.  For this size pot I use about 1 cup of brown sugar to start and about a tablespoon of each of the spices.  Add in about 1 cup of water and let it cook on low for about 8 hours.  Sometimes I stir it but sometimes I'm not home and that doesn't happen and it doesn't seem to matter much.  If you have extra product, just add it in as it shrinks - about every two hours.  Add a little more spice and sugar as well when you add apple product.

When the apples are soft it is done!  You can can it as applesauce if you puree the mix.  I also like to put about 3 cups in a gallon Ziplock bag and place it flat into a pie pan and freeze it!  When you are ready to use it you just put the lot into a pie crust, sprinkle with flour, add a little water and bake for the required amount of time.  Easy holiday rescue plan - especially if you are doing potluck.   You can stack them in the freezer easily too!
 
I have used this as an add in to cake and muffins as well as a cookie called "Fresh apple cookies".  This makes it fast if you already have a jar or a frozen batch of spiced Alaska apples.
 
Fresh Apple Cookies
 
1 1/3 C. Brown Sugar
1/2 C. Butter
1 egg
1/4 C. milk
2 C. Flour (you can use rice flour as well - just cut the Brown sugar to 3/4 C.)
1 tsp baking soda
1 tsp cinnamon
1 tsp cloves
1/2 tsp Nutmeg
1 C. Spiced Apples or 1 Cup diced apples
1 C. nuts ( I have also used sunflower seeds and it is lovely)
1 C Raisens chopped small - optional but you'll miss them
 
Cream first three ingredients and add the rest.  Drop by large spoonfuls onto a baking sheet. bake in pre heated 350 degree oven for 10 to 15 minutes.  This is a soft cookie so don't over cook.
 
Serve with fresh hot coffee or black tea!


Happy Holidays and Festive Baking!
 

Thursday, November 1, 2012

The hardest thing...

I know I said I was going to talk about apples again but this has been weighing on me this week and I just need to get it out - we'll do apples again next time!

I have a friend right now who feels like she is going through the hardest thing she will ever have to do, a bad break up with a long term lover, her only car key broke off in the car lock, and she has been displaced from her home.  All of these are hard things, but she is a teenager, and they all happened to her in the space of about a month.  And she lost her father a few years ago.  She is feeling like she would not like to be part of the planet any longer since it is too hard right now.  That got me really thinking about what is too hard?  What have I done that I thought was the hardest thing I would ever do and then learned that it WAS NOT the hardest thing by a long stretch!

What do I say to someone who thinks this is the hardest thing she will ever have to live through and she doesn't think she will make it?  What would you say?

I had to stay at a college I hated as a teen and finish out the school year (thought that was hard but I was young and dumb remember).  Another time, I gave birth to an early baby and thought childbirth and parenting was the hardest thing I would ever have to do (it is hard but worth it), but my two biggest, hardest things so far have been the time that I lost a child (as in death), and the time that I had to hand my child to a surgeons hands and say to him "I trust you with my childs life"!  And I signed a paper saying that I trust him!  I also have seen a friend lose their child and I am sure that it was the hardest thing she has ever done to get up every morning and go forward with faith.

I have another friend who lost their child to death today, but the child was lost to drugs long ago.  Is that the hardest thing to watch your child slip away to that world and you can't pull them back?  I don't know but I hope she is able to go forward with faith anyway and survive that.

My best friend lost her husband this year to cancer and I know that I have never done anything that hard.  My heart breaks for her every day when I think of the faith she carries every day when I know she doesn't want to.

I have more than one job, and that is not too hard when I think of the things I have done that I really thought I would not survive, or that my child would not survive.  Or of all of the things that my friends have survived that are harder than anything I do any time.

But what do I say to the girl who sees no light at the end of her tunnel and grease at the end of her rope with a flaming pool under it?  She has no comprehension that this might not be the hardest thing she will ever have to do and I'm not going to be the one to break that news to her.

She is getting help, don't worry - I'm not letting her flail about and figure it out.  She has a good support system in place and she will make it!  I have faith!

I want you to think about the hardest thing you have ever had to do, and then look around you and see if it's not a lot easier than what someone else has had to do.  If it's not - I am sorry.  If it is - go out and do something nice for the person who's got it harder than you! 

Blessed Samhain!

Sunday, October 21, 2012

Alaskan Apples - What to do with them!

 
 Crab apples being prepped for the juicer above, and apple pieces in the juicer below.
 
Im my previous post I talked about some of the great varieties of apple that wil thrive in Alaska and preserving the harvesting heritage.  Now we're going to talk about some of the great things you can do with these apples!  Crabapple jelly is by far one of the favorite uses of crabapples here at Wicked Raven.  The jelly is a clear rosy color and has enough natural pectin that none has to be added and it still makes a "stacking" jam!  That means that you can stack it up on whatever you're making and it stays there!  It makes a great gift jelly in a pretty jar with a bread mix (Ill help you with that one in a later post).
 
The juicing process takes just about all day with a stove top juicer and Im sure you could speed it up somehow but I like having the process going on in the kitchen while I sew, clean, prep menus, or any number of other things that two job hockey mom  hobby farmers never seem to catch up on.  It also makes your house smell great!  Whats not to love.
 
This batch of apples (about 3 gallons whole) produced about 16 cups of juice and I used all but four of that to make jelly.  The other four cups we added one cup of sugar (you could probably use less or use liquid stevia too), chilled it for about two hours and the kids drank it with dinner!  So good and so full of natural vitamins.
 
Best Crabapple Jelly
 
4 Cups Crabapple juice
4 Cups Sugar
1 tsp. cinnamon (optional)
 
Using a large saucepot, bring all ingredients to a boil over high heat stirring constantly.  Cook to gelling point (when you drip some on the spoon rest, then tip the rest it moves slowly or not at all).  Skim foam if necessary and ladle into hot jars leaving 1/4 inch of space.  Place two-piece caps on and process in a hot water bath for ten minutes or use the quick turn method to seal.  (see below for directions)
 
Starting the Crabapple Jelly

The quick turn method to seal jars is a simple way to seal your jelly without a water bath.  You cannot use this method for everything - I only use this for jelly.
 
Once your hot jelly is in the hot jars, adjust the two piece caps and tighten them down.  Turn the closed jars upside down and set your timer for five minutes. 

When the five minutes is up turn the jars right side up using a quick turn or flip.

Let jars sit and you will soon begin to hear them seal - some go fast and some go slow but I have never had a jar not seal unless I had a glob of jelly on the rim that I missed wiping off!  Good eating!

This is a great way to keep your jars hot while your product finishes.  Put the clean jars in the oven on warm while you finish the product and you won't have to worry about them being hot enough!
Blessed Be and Happy Harvest Time!
 
Tune in to the next post for Easy Spiced Apples!
 

Monday, October 8, 2012

Apples from Alaska!

This post also falls under gardening with your kids!  The apples below are on a tree at Snowfire Gardens (see my links for more information) and we have so much fun every year rounding up all the kids (even the grown ones) and doing harvest at Nana and Boopah's house (or Gramma and Grandpa as you may call yours)!
This tree is a Carroll apple and it produced that whole blue bushel tub full of apples - good eating apples too! Even in this crappy weather we had all summer here in Alaska the orchard had a banner year. My parents do have a ten foot tall fence to keep out the moose riff raff so their trees dont get trimmed the way ours at Wicked Raven do. There are a total of four families and includes six grand kids - four boys and two girls who come together at least one day a year and do a family harvest day at Snowfire. It is a great family bonding time as well as teaching too. This year besides apples we dug potatoes, dahlia bulbs, and harvested two kinds of Kale.
 Above Nana, Raeley and Devin harvest two kinds of potatoes, below, before the wash cycle!
With all the rain we had here in the Matanuska Valley the potatoes were a little harder to harvest - soil was very wet and heavy!  Lucky we have some strong youngsters (and energetic adults) to help!  Two of the kids didn't get to come to harvest day this year and boy were they salty pretzles about it!  The only saving grace was that we chose a sunny day - one of very few we had all summer!
 
The above is Kim picking from an apple-crab tree and we got another bushel from this tree.  This is a great way to teach the kids where their food comes from, how to take care of it (you absolutely cannot just drop apples into a bucket), and how long some things take to grow.  This orchard has been growing for about 12 years, and there are about 15 varieties of apple and apple crab trees.  Check the web site in the summer at www.snowfiregardens.com for garden tour schedule if you would like to see the orchards and gardens.  Its worth it!

Here at Wicked Raven Farm we have 7 varieties of apple and crabapple trees.  We have had only one tree produce thus far, however our orchard is only about three years old and regularly gets trimmed by a momma moose who comes with her calf each year.  We also have two varieties of grapes (yes they will grow here) and we have 3 varieties of cherry trees and we had enough for a pie last year!

Tune in to the next blog to see some of the fun things we do with apples!  Yum!

Sunday, September 23, 2012

Here comes the Sun-Gold


We love SunGold!  The round yellow orbs in top picture are ripe Sungold tomatoes mixed in with Brandy Boy (the wrinkly ones - its not market pretty but it is so so tasty - one for another blog).  They are also mixed with a few red hybrid grape tomatoes as well.  We grew Sungold for the first time last year as a trial - Reeds choice.  They are a winner!  We call them tomato candy.  They are so sweet, but still have such tomato flavor.  We have used them for all kinds of recipes, (see salsa recipe below) but we are lucky if they make it into the house (they get eaten on the way).  As you can tell by the bottom two pictures, they are a very indeterminate plant and the tomatoes grow like grapes on the vines.  These have had the leaves thinned out so any sun we do get will ripen tomatoes and not produce leaves!  The bowl on the top picture is the 5th of its kind filled mostly with Sun Gold for this growing season, and if the Goddess is good to me that is only about one tenth of what are on the vine in the greenhouse.  It just has to not get 20 below in the next month and we will be able to harvest all.  All of these pictures were taken today so you can see that we are still rockin in the greenhouse with the tomatoes.

Sun Gold tomatoes are a treat to grow - very low maintenance, they expect to be watered plenty but they dont fuss if they dont get that.  They arent sensitive to wide temperature changes like some of the other plants, even to as low as 36 degrees and as high as 90.  They dont mind a sweaty greenhouse and they dont mildew easily.  They seem very non-susceptible to blights and mildews or other tomato diseases and white flies dont bother them at all.  The worst quality I have to name about these plants is that they get so tall and lanky and produce at the top that I have to use a ladder often to pick them.

If you leave them on the vine for too long they will split, but I have had a vine of them break off and they ripened in my bowl in the window beautifully!  I have 4 Sun Gold plants in my mix. They freeze beautifully and they can without losing all of their color. Pick early and often and enjoy!

Sun Gold Salsa

12 oz. Ripe Sun Gold Tomatoes cut in fourths (or however many you want to use)
1/2 onion diced finely
1 orange and 1 yellow pepper diced finely
1 small bunch cilantro finely chopped
1 tabasco pepper (if you like hot - leave out if not) pureed
1 small bunch fresh parsley finely chopped
pinch of salt

If you dont have a tabasco pepper, use a dash of Franks or Tabasco sauce.

Mix all together in a non metal bowl and enjoy with whatever you like salsa with.  We have made this into Salmon dip by adding 1 can salmon and 8oz. creme cheese!  Yum!


Saturday, August 25, 2012

A Childs Garden


A Childs (Reeds') Garden - This is an easy way for your children to have their "own" gardens and really take ownership of the growing world around.  These particular plots belong to my 12 year old son who has been gardening for years but only on his "own" for about three.  We used non treated wood that was left from a dock building project from years ago.  2x6" pieces and these are 6 feet long.  This make a great sized space since it doesnt have to be walked in very often at all, to pick the produce or to keep up with weeding.  The idea for this came from the book "Square Foot Gardening" by Mel Bartholemew.  My son has perused the book at length and while I wont swear he has read it, he has gleaned a lot from it and I have as well.  This system does produce more goods than the row by row gardening method by far.  Reed has had much better success especially with carrots, radishes and beets using this method than I have using row by row methods. 

We used 3" screws to hold our wood pieces together, and we did dig out the original dirt and replace it with good garden soil.  As we are in the Millers Reach Burn area we have been left with heavy clay and sand in layers instead of soil so our remediation is necessary.  If you are starting with good soil it would not be necessary except to have a clean slate and fairly weed free to start, which I highly reccommend for childrens plots.

Reed also chooses his own seed (great winter time activity together), and I help him with the ordering.  We have tried some great things like Daikon Radish (success) and eggplant (fail) but it has really given him a good start towards knowing what we can and cant grow and how far we might be able to test the limits of our growing area (solid zone 2).

For one of his garden plots he also chose raspberries and strawberries from a local grower (so we know they are hardy) and he has had such success with those that next season we will have to separate the strawberries out - both types have outgrown the plot.

In the background of the top photo you can also see what looks like two sticks in a hole - that is actually Reeds apple tree - a Minnesota 1747 in its second year here at Wicked Raven.  Reed was really excited to have an apple tree of his own and we are excited to see how it will do with apples on it (maybe next year). 

There are so many opportunities to grow with your kids and it really is very simple.  Just begin!

Blessed Be!

 We decided this year to add two more of the raised beds (seen above) in Reed's garden area.  They have done so well that we are considering letting the big garden (seen in the background below) go back to meadow and just using the raised beds and the huglekulture areas.  Nothing grows quite as well out there as in the raised beds that Reed makes.  These new ones will be all ready for planting next season!
Above you can see the boys working hard (Reed and his friend) to get the turf out of the areas where the raised beds will live.  In the already established beds you can see two types of cabbage and kohlrabi in the one on the left and raspberries in the one on the right.  Those raspberries will be moved to a huglekulture bed as soon as it is ready and will make room for Reed to plant more carrots, celery, parsley and other yummy veggies.  We have already moved the strawberries out into  a Hugelkulture bed - they simply outgrew the space.

The turf comes out of the raised bed area and goes right over to the Huglekulture bed area to go onto a new huglekulture bed for the raspberries.  We left enough room between the raised beds to mow with the riding mower so that makes it much easier to take care of and keeps the pests away too.  Raised bed building is a great way to get the kids involved and outdoors as well as teaching them how to grow great things - including themselves!

Tuesday, July 31, 2012

You've got mail!


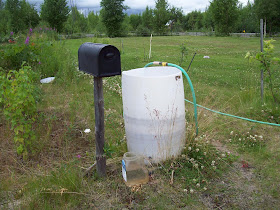
Garden Mail that is!  This is a great storage idea for garden tools and those berry baskets and work gloves that are never where you need them!  Put them in a mailbox and close the door.  Weatherproof (mine stays out all year), and easy to use.  I used a two by six as a base and screwed that into a wood post, then I screwed the mailbox to it all around the bottom.  The moose knocked it over one year but I just popped another wood post under it and voila!  I've still got mail!  I got one for my greenhouse as well that is a top opener and holds all sorts of tools, snippers and gloves.  Both of my boxes came from the Salvation Army store - just keep an eye out and you'll get lucky one day!  You can also put fun covers on your mailbox - or paint it with a mural - I just havent got that far!  Its a great place for imagination to wander and it can also work as a vining stand for clematis, beans, or roses! 

The top photo also shows one of my rain barrels with a leaky hose draped over the top - thats an easy way to gather water that otherwise might be wasted!

Saturday, July 28, 2012

Huglekulture Dreams


We are having a great strawberry year here at Wicked Raven Farm!  I changed over my strawberry patch to the hugelkulture system you see above.  The top photo shows a completed hugel bed and the bottom photo shows one that is in progress.  It is layers of what most of us would consider yard rubble(twigs, branches, rakings, mowing leavings, clippings and in Big Lake lots of burned/dead/rotting logs, and other organics) layered up and covered with a layer of good soil.  Then I used landscape fabric to have some weed control and covered that with a layer of wood chip mulch (which I got free from the side fo the road - the State does chipping and gives it to the local residents).  You can get more information and directions for the hugelkulture by googling Sepp Holzer or hugelkulture.  One of the benefits of this system of gardening is once the initial work is done it is easy and low maintenance!  It also seems to keep the birds out to the strawberries a little as I dont think they like the raised openness of the beds now.  Ill keep you posted on that theory.  The other big benefit of the beds is that it feeds itself as the materials that it is built with break down it is a perpetual composting system that you dont have to work at! 
Ths system is also great for kids!  All kids like to help in the yard (at least the non teenagers) and with this system they can feel really helpful as no matter what branch or log they bring will pretty much go into the hugel bed!  It is also very exciting for them to be able to see how well things grow in there and participate in the harvest!  A learning experience from start to finish!  Have fun!

PS - the little black dog is a fantastic rescue from a grocery store parking lot!  Dont be afraid to get/give some love!

Friday, July 13, 2012

Sunchokes - harvesting the sun in Alaska.


These are Sunchokes - planted in the fall of last year in an empty row of my garden!  They all came up (I planted a pound of the tubers - about 20)  These are like potatoes in the way that they grow but you dont have to hill them and they are VERY low maintenance!  This is in Big Lake Alaska and although we did not have -52 below and we did have great snow cover, I think they will probably do well here in any type of winter.  I planted these very late in the fall too (it was already freezing at night here), and they did not seem to be bothered by that at all.  Sunchokes grow on top like sunflowers and their flower looks similar to that.  The taste is hard to describe and we all like to say they taste "fresh".  They are crispy raw and they cook up to be a little softer than a potato, more like a sweet potato.  We have not tried them as fries yet but it is on the list to do soon.  The kids around here like to eat them right out of the ground raw, like a carrot.  Give some a try and see how you like them!  My Sunchoke seed came from Johnnys Seed, but it is available from a few other places as well.  I will be saving some of mine and replanting them this year to try that, and I will also order a few more to put in as new starts.  Ill keeep you posted on what works the best!  Wicked Days and Blessed Be!

PS These are also called Jerusalem Artichokes, and you may be able to find seed more easily with that name!

Tuesday, July 3, 2012

Keep the Kettle on!

Heres an easy way to lend a little bit of sanity and safety to your life during a power outage or other crisis; always have your tea kettle full.  When you use it refill it right then and you'll always have clean drinking water (at least a little) for any emergency.  The kettle can be carried outside to release a tongue stuck to a metal post, to use as an eye wash for those dangerous splashes of fuel or other chemicals people use around the house and garage.  It can also be heated up on a camp stove, fire or in the BBQ grill for that emergency tea or coffee.  For those of you who dont have a tea kettle; what?


Tuesday, June 26, 2012

Venting on the Dryer

Lets talk about the dryer now that we know that the computer is an energy sucking vampire!  We are on oil heat so our dryer is of course electric - but this applies even to gas dryers.  We use our dryer in the winter only with few exceptions.  In the summer we line dry everything - we have a pull out clothesline from Lehman's non-electric catalog/lehmans.com (a favorite here), and we can put out usually 2 loads of laundry at a time on it.  I do have mine on a porch since my laundry is on a third floor, so it is under the roof overhang.  I am able to dry clothing even in somewhat rainy weather.  In a downpour they arent going to dry but - the savings per month?  More than $30.00 in electric all summer.  From May to October we dry laundry outside and reap not only savings in dollars but wear and tear on the clothes/fabrics.  And who doesnt love the smell of line dryed laundry - especially bedding?

Here is a great link with information on how much the dryer costs:

http://blog.gvea.com/wordpress/?p=877

Monday, June 25, 2012

100 Watt Computing

I read the other day that leaving your computer running 24/7 is the equivalent of leaving a 100 watt light bulb burning 24/7! (It was either Mother Earth News or Hobby Farm article).  I dont know one person who would leave a 100 watt light bulb burning except to heat the chicken coop for the baby chicks!  Turn it off!  It can make almost a $20.00 difference in your electric bill as well.  I have been turning my computer off if I am leaving the building for more than an hour and at night as well.  In one short month I have seen a near $20.00 drop in electric bill.  If you want to spend $20.00 on something send it to the local food bank or homeless program, (MYHouse is a good one), or to any number of things that will make really good use of that money!  I have not been able to find anything that says that it will harm your computer in the least to turn it off, and it takes only a few minutes for it to boot up again - bathroom time, tea/coffee making time, or any number of things you can use those minutes for - it's all good!  And don't forget to turn your lights off as well!