I know that any of you who read my blog regularly know that I also work at a High School - Houston High in Houston Alaska. It is a smaller school for our area but big on pride and bigger on heart even! We have about 400 students and 50 staff members. Our staff is the BOMB! I feel like we have some of the best teachers and staff members in Alaska - from the Administration to the Custodians and the Secretaries (me and one other lady) we all have a vested interest in making sure the students are successful. One of Reeds (my son - 16 years old now) favorite classes and teachers is Mr Conner - Mr Conner is teaching ecology this year and he also teaches Alaska Wildlife, Biology, and other science classes. He is a "hands on" teacher and that is one of the reasons that Reed has been able to connect with him so well. I too am a "hands on"learner.
I had opportunity to join his class recently for a project that I have been wanting to participate in and learn for a number of years and it finally worked out that I was able to troop out with his class and learn how to tap Birch trees! In Alaska we don't have maple trees like Vermont and some of the syrup states, but we do have Birch trees and they can be tapped just like Maple trees, the sap collected and boiled down to make syrup and other sweet products. The above photo shows the class in the trees behind our school searching for the right tree to tap. This was about two weeks ago (end of April - very early Spring for Alaska - but Spring did sprung early this year too).
We determined that this tree is a good one and prepare to tap it.
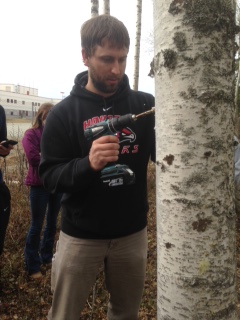
Mr. Conner uses a cordless drill with about a 1/4" drill bit for this part. Make sure your batteries are charged! Nothing like carrying that thing out into the woods and have it be dead and trudge all the way back to get a different one! Mr. Conner did NOT have that problem - but it could be one of my best tricks!
Drill into the tree about 2 1/2 to 3".
Try not to have any of the shavings that might redirect your sap flow or clog up your tap.
With the tap in place (you can see it just at Mr Conners left shoulder - greenish nozzle) hold your bucket up and make a mark where the hook needs to go so that the tap runs the sap directly into the bucket. It looks like a simple cup hook with one screw end about 3" long.
Screw the hook in. Below left shows the bucket hanging and below right gives you a better shot of the whole set up.


Here we go on our second tree of the day - the whole process to do three trees was done in about 1/2 hour and that includes the instruction to the class and some taste testing. Survival tip: Birch sap is a huge percentage water. If you are ever lost in the woods and you can poke a hole in a Birch tree you will never be thirsty!
Above photo has the tap in place and Mr. Conner is putting in the hook - you can see the sap running down the side of the tree (that dark line in front of him).
Tap and hook are in place and the tap is flowing with sap like a faucet! It was really incredible! Below photo shows the second tree set up complete. Each student got about 1/2 gallon of sap to take home and to cook down into syrup. This counted as a project grade for the students and it was fun to see the reactions you get from them when they end up with a very small amount of syrup from their sap. Some of the students loved the flavor and others did not prefer it.
If you want more information on how this works or the products that can be made with Birch sap - check out Kahiltna Birchworks. They are at the fair every year and I have to have me some of that Birch Taffy! So good! This is a fun project to do with kids as well - really easy, great science and so many uses right from nature! Go to the woods! Enjoy!


No comments:
Post a Comment