Friday, June 24, 2016

The Door is Open, broken and catching water!

A couple of years ago (two I think) our garage doors took a hit during a storm and one of them wasn't able to be repaired.  So it was time to replace both garage doors!

Below is the new door but gives you an idea of the panels that I mention.
 All the metal materials (the rails that the doors ride on) and all of the pressboard from the panels ended up in a pile in the yard - a lot of the metal was twisted and bent.  I was able to dig right in and use the panel pieces right away as benches for plant growing in the greenhouse - an immediate upcycle!
Below is one of the benches that I made with a pressboard panel.  Of course covered in the upcycled tinfoil that the Senior class gave me!


The below photo shows the twisted pile of metal that used to be the guide rails for the doors.  I just had to find something I could use them for!  I can't stand dumpster only items so.....


I got my trusty saw and my tin snips and I went to work making a way to catch more rainwater from my barrel system.  I have a great water catchment system set up from the greenhouse and my little shed that I put rain gutter on and directed it into a series of barrels.  But when it is really hot and dry I go through all the water from the barrels in a hurry.  The barrels fill up and then just overflow onto the ground - but I wanted to be able to also use rain water to fill up the barrel inside the greenhouse with that great mineral filled rain water as well. 

Below is a chunk of the metal that I started with.  I planned to create a diversion system to a secondary water tub beneath each rain barrel to give me and extra 50 gallons or so of water.  I know that I have a hose and sprinkler, but the sprinkler spray only waters to an inch or two below the surface and it uses a lot of electricity running the pump to try to get the water to the plants.  Its a way better system to have gallons of water on standby - relatively free that I can pour a good quantity onto the area directly where I need it.


I know it doesn't look like much but just wait!


I used the same sealant that I used to keep the rain gutter together (recommended by my Lowe's helper).  My rain barrels are upcycled soap barrels from a car wash.  I paid $25.00 each for them from the local car wash and rinsed them really well before I used them.  Call your local car wash or watch for them on Craigslist.


I measured and cut a rectangle wedge out of the lowest side of the rain barrel.  I used my tin snips to flap the barrel end of the metal trough (see below) to give the water a good path.  I put a seam of the sealant on each edge of the cut and wedged the metal trough part into the space.  After it was dry I used sealant around all of the edges that touch the barrel.


This way when the main barrel becomes full it diverts it into the lower barrel/tub.  The one below is just a Rubbermaid plastic tub that gives me an extra 20 gallons of water, but even if all you have is a 5 gallon bucket its a good thing!

I am thinking I will put this on the base of an old yard cart that the sides are missing from so that I can roll it to the plants I need to get it to.  


The barrel below has two incoming gutter pipes - one from each side of the shed - that is the reason I did this barrel first - it fills up faster than any of the others.  I plan to do this with all of the barrels I have around the greenhouse and house.  Makes great use of the damaged metal and makes my life easier as well!

Simple and fairly easy to DIY!  See what you have to use that can upcycle into a great catchment system for your farm!

*** There are some states that restrict the catchment of water - please do check the regulations where you live - or be a water outlaw!

Monday, June 13, 2016

A Fountain on any Farm Urban or Remote!

I know you have all been wondering where the heck I've been - It's been a while since I posted but I really have been busy - getting a lot done!

I love the sound of water!  Something about the flow, the swoosh, and woosh as it runs down a water fall, creek, or pot fountain soothes me and takes me to my happy place if even for a moment!
Don't know what a pot fountain is?  Well let me tell you!  A pot fountain is a beautiful planting pot turned into a fountain!  Im pretty sure you have seen them on Pinterest if you have that - if not just see below!

The above fountain is in place at my moms house - Snowfire Gardens.  It is a huge pot (about 3 feet tall) and makes a wonderful splashing that the birds, bees and people love to watch (children love to splash in it - yes).  It was made by the purchase of a large pot (Fred Meyers, Kroger, or even Home Depot and Lowes are all sources for these), make sure your pot has only one hole in the bottom or that you have a way to seal up the other if it has more than one, a small pump kit (not sure what size this is) and a bushel plastic bucket.  It also requires some metal mesh - like the stuff you scrape your feet on in front of the schools.  I used a grate material that came out of an old car wash.  I dont recommend aluminum as it is too soft and wont hold up all the rocks and other stuff you will be putting on it.    You will also need some tubing or PVC or copper pipe of a size that will fit the hole in the bottom of your pot.

Product Details
The above right is similar to the bushel basket I used - this project is a re-vamp for me so I wasn't starting from scratch so you could see the whole process - sorry!  The left is very close to the pump I used for this project.  

Dig a hole that the bushel tub will fit into and almost level with the ground.  The tub should stick up about 3 inches above the soil level.  My tub is round but it doesnt have to be - square, oval or rectangle will work also as long as your steel mesh material will fit over the top of it.  Make sure you choose a location for your fountain that isnt close to an area of high vehicle traffic - the motion will cause the sides of your bushel tub to cave in potentially.


Above you can see the side of the tub and the grate material that I used.  Below you can see the bags I used to keep the weeds down under the rocks for the fountain.  Be sure to tuck the bags under the edge of the pot - I didnt do it the first time and that is why you get to see the re-do!  Should have done it the first time.  The grass loves the amount of water it gets around the pot. It also gives you a better view of the grate material.  It just has to be wide enough to let the water through and narrow enough to not let rocks and debris fall into the tub underneath.


Below is the view into the pot - my pot is much smaller than the Snowfire Garden on but my space is smaller as well.  You can see the PVC pipe sticking a few inches up through the hold in the pot.


Below is another view of the pot with the PVC coming up through.


Below you can see the PVC coming out the bottom of the pot.  That is the pipe that connects to the pump under the water in the tub.  I had to put the pump on a brick in the tub to get it to reach high enough to put the PVC onto it.  Be sure you have this part set up BEFORE you put the rocks on the grating or you will have to move them all again to get to it and make it fit right.  Voice of experience there too!  Its okay if there is a gap around the tube - some water will run back out of the pot and you want it to - if water stays in the pot and it freezes it will break the pot.


You can see above the level of the water in the tub - you have to fill it up almost to the top.

I also had to adjust the length of the pipe and cut a little off of the end inside the pot - if it is too tall the water shoots up like a geyser and doesnt go back into the pot - just waters the lawn!  It took a little time to get that part right and it depends on the size of your pot how much you can have sticking up in side the pot.


The above photo shows the gap I leave that the PVC fits through to attach to the pump.  Just enough to get it through and still keep out debris.  Once you have your grating and your pot in place you can put all the rocks you have collected around it, making sure to cover the bags and the grate material so they cant be seen - a little bit of a natural look.


This is a great project for those of us who are ultimate rock hounds!  You can bring all of your pretty rocks to your fountain area and keep adding them and adjusting them until they are just right for you.  I have a lot of favorites including the ammonite you see in the upper right of the photo above.  Its a fossilized giant snail!  The water splashes over the rocks and makes them look polished and brings out their true colors.


I also added a Rhubarb leaf birdbath to the fountain area.  I have it adjusted using some of the rocks so that the birdbath fills when the fountain is running but so that the water still runs back into the tub underneath.  Ill give a little tutorial on the Rhubarb leaves in another blog - be watching for that!

This uses a lot of water when you are running the fountain - you have to fill it every time you use it - sometimes while it is on if it is really hot or if the wind is blowing.  Just run your hose into it and fill it up!  If you dont keep it full enough you risk burning up your pump.

This is not a one day project for the most part - unless you are putting in a really long day - but it can definitely be completed in a weekend!  I hope you can create an oasis where ever you call home and enjoy the sound of the water soothing away your cares!


Thursday, May 12, 2016

Tap That - Birch Tree That is!

I know that any of you who read my blog regularly know that I also work at a High School - Houston High in Houston Alaska.  It is a smaller school for our area but big on pride and bigger on heart even!  We have about 400 students and 50 staff members.  Our staff is the BOMB!  I feel like we have some of the best teachers and staff members in Alaska - from the Administration to the Custodians and the Secretaries (me and one other lady) we all have a vested interest in making sure the students are successful.  One of Reeds (my son - 16 years old now) favorite classes and teachers is Mr Conner - Mr Conner is teaching ecology this year and he also teaches Alaska Wildlife, Biology, and other science classes.  He is a "hands on" teacher and that is one of the reasons that Reed has been able to connect with him so well.  I too am a "hands on"learner.


I had opportunity to join his class recently for a project that I have been wanting to participate in and learn for a number of years and it finally worked out that I was able to troop out with his class and learn how to tap Birch trees!  In Alaska we don't have maple trees like Vermont and some of the syrup states, but we do have Birch trees and they can be tapped just like Maple trees, the sap collected and boiled down to make syrup and other sweet products.  The above photo shows the class in the trees behind our school searching for the right tree to tap.  This was about two weeks ago (end of April - very early Spring for Alaska - but Spring did sprung early this year too).


 In the two above photos we are discussing the qualities of the Birch tree and what makes a good tapping tree - not too many other brushy trees (especially willows) around it, on a hill is good, and although it doesn't have to be a huge tree, a tiny one probably won't get you what you need to get!


We determined that this tree is a good one and prepare to tap it.


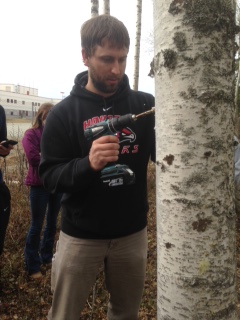
Mr. Conner uses a cordless drill with about a 1/4" drill bit for this part.  Make sure your batteries are charged!  Nothing like carrying that thing out into the woods and have it be dead and trudge all the way back to get a different one!  Mr. Conner did NOT have that problem - but it could be one of my best tricks!


Drill into the tree about 2 1/2 to 3".


Try not to have any of the shavings that might redirect your sap flow or clog up your tap.

With the tap in place (you can see it just at Mr Conners left shoulder - greenish nozzle)  hold your bucket up and make a mark where the hook needs to go so that the tap runs the sap directly into the bucket.  It looks like a simple cup hook with one screw end about 3" long.


Screw the hook in.  Below left shows the bucket hanging and below right gives you a better shot of the whole set up.


 This spring the sap was running hard and it only took about 24 hours to fill the 5 gallon buckets.  It doesn't hurt the tree but Mr Conner makes a practice of not tapping the same tree twice.  There will be bugs and bees and maybe some birds who will be curious about your bucket and its contents.  You are boiling the sap so just pick those bugs out and crack on!


Here we go on our second tree of the day - the whole process to do three trees was done in about 1/2 hour and that includes the instruction to the class and some taste testing.  Survival tip:  Birch sap is a huge percentage water.  If you are ever lost in the woods and you can poke a hole in a Birch tree you will never be thirsty!


Above photo has the tap in place and Mr. Conner is putting in the hook - you can see the sap running down the side of the tree (that dark line in front of him).


Tap and hook are in place and the tap is flowing with sap like a faucet!  It was really incredible!  Below photo shows the second tree set up complete.  Each student got about 1/2 gallon of sap to take home and to cook down into syrup.  This counted as a project grade for the students and it was fun to see the reactions you get from them when they end up with a very small amount of syrup from their sap.  Some of the students loved the flavor and others did not prefer it.


If you want more information on how this works or the products that can be made with Birch sap - check out Kahiltna Birchworks.  They are at the fair every year and I have to have me some of that Birch Taffy!  So good!  This is a fun project to do with kids as well - really easy, great science and so many uses right from nature!  Go to the woods!  Enjoy!

Wednesday, April 27, 2016

Put it on Paper

I often struggle when designing my blocks with having to cut the fabric before I'm sure that I will LOVE how the fabrics will go together to finish the block.  Reading saves the day!  While reading one of my quilting mags, a reader had a tip to make a color copy of the fabric on paper and cut out your pieces from the paper sheets and lay together in your design - It works wonders!  It was in the June 2016 issue of American Patchwork and Quilting, "Tips from Readers" section.


I chose the fabrics that I thought would be the finalists in the block - the teal color is a favorite fabric that I have been saving for something special and want to have it be the center piece of a project - I just haven't been able to be positive that I will LOVE it once I put the feature fabrics together for real.  I just laid the fabrics on the glass of the copy machine and pressed green for go!  It doesn't matter if there is some white around the edges - you can trim that off when you cut your pieces.


Color photo copies aren't always exactly true to color but they are awfully close.  Use your paper scissors for cutting the pieces - paper will dull your rotary and your scissors alike!

I drew the pieces on with a fine tip Sharpie and then just cut them with scissors instead of trying to rotary cut them..  I made multiple copies of each fabric in case I wanted to  change up the pieces or rearrange them  in a different setting.

Cutting the paper pieces and taking a picture of it let me see that these colors aren't quite what I was looking for - the darks are too dark and the light is really a medium!   A secondary trick is to lay the pieces on different background colors and rearrange them to find the one you love.  It works great and I didnt have to cut my beautiful fabric before I was really ready to build the quilt!

Have fun with it - Im pretty sure this could work for scrap booking and other textile arts as well!